3.16.2009

Shrink wrapped and ready for a paddle


After getting the kayak home I finished the stem plates and sanded some rough edges.


Then I took it over to Chuck and he shrink wrapped it for me.


But it would have to wait a week while I went to Florida for a little Relaxation and Sunshine!


I was originally going to go to a pool session, but that didn't work out. So Allan and I decided to take our kayaks to Metro Beach for the test. When we got to our usual launch it was full of ice chunks. So we went over to the boat ramp and found some open water.

There was still ice out there so I just had a narrow space to go back and forth in front of the launch.


It didn't take me too long to get comfortable and want to do more. Since the ice seemed thin I decided to cross the channel and break up the ice. Such a bad idea. Did you notice I'm not wearing gloves? Forgot them at home. I also forgot how fragile the shrink wrap is. Didn't take long for the ice to rip holes right into it.


So the kayak started to fill with water and became unmanueverable. It was like slow motion and I knew I was going over, I was halfway out before I went under!


I tried pushing the boat, but it was full of water and sooo heavy I wasn't getting anywhere.


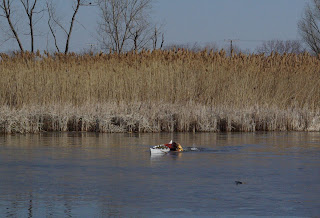
So I moved to the bow and tried pulling it, which was also slow going. This was very frustrating and I thought about leaving the kayak and just getting out of the cold water.


Allan had his dry suit on, so he jumped in to help...and swam right by me! Apparantly his boots had not been tightly secured and they were floating away.


I then decided it was time to get my hands out of the water, so I finally put the paddle in the cockpit and moved back down to the stern to get them out and on top of the kayak.


We finally made it to shore, look Allan has both his boots. But his zipper had not been zipped all the way and his drysuit was full of water!My hands had never been so cold! I had a drysuit on, so my core temp stayed warm. Thank you Chuck for helping me warm my hands and of course for documenting the whole thing!


I had to cut a hole in the shrink wrap so we could fully drain the kayak.


I did have one float bag in the front, but not the back. I have to make that one to fit the narrow lenth of the kayak.


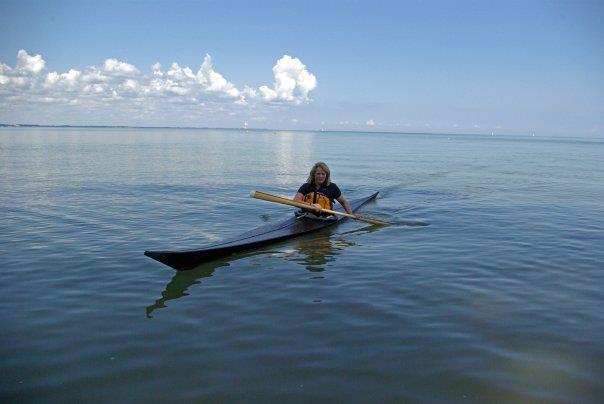
Overall I liked the fit of the kayak in the short time I paddled it. I do think the masik is too high, it doesn't make contact with my legs when I'm sitting. I might think about making a new one. Fortunately I didn't have any trouble with the wet exit. So no need to remake the one deck beam that was supposed to be curved for easy entrance and exit.


3.14.2009

The Last Saturday


I was at the shop bright and early for a very long day of work. I asked Allan to meet me there to help clear out some things we no longer needed and then to get the chines in place.


We spent almost an hour putting one side in place and then matching the other side exactly. I had to block a few up, just like I had done with the keelson. The ends also had to be planed down to make a nice curve.


Just as I finished lashing one in place, Danielle pointed out a bad curve from her perspective. The problem was two of the ribs behind the center line of the kayak were too tall. At this point I didn't really want to try and bend two new ribs, so I asked for ideas. Chuck had a good one, shave off some of the inside of the chines where they rest on the ribs. I think this actually helped, although there is still a little weird curve in them. But Chuck promises it won't affect the handling of the kayak.


So once again, what should have been simple, was not, taking way too much time. So I begged Chuck to keep the shop open after dinner, so we could work til 9:30pm. Thankfully he agreed and everyone gave a cheer out for Chuck!


After lunch I moved on to attatching the masik. Somehow instead of really tight and having to be forced into position, it was now actually not big enough as the kayak had spread out. I just decided to keep going and pegged it into place. Later on I will also lash it into place for reinforcement. I also need to sand it down some as it is a little tall.


I also added a missing deck beam between the masik and footrest. It is usually curved, but for time I just made it straight and placed it a little higher. I can replace it with a curved beam later if I don't like it after the test paddle.


I also did some extra lashing and sanding of some edges before we finally went home after 12 hours in the shop.

3.04.2009

Stem Plates

This Saturday was another rough one. Didn't seem like I got enough done...again. I mostly worked on the stem plates. They provide a connection and fair curve between the gunwales and the stem pieces.
As you can see I had to cut into my oh so thought out stem plates and gunwales. It just seemed wrong to cut into something I had spent so much time putting together. But I did it, trying to cut a straight line 10 inches long for the plate to sit into.
The plate has to be carefully pegged into place. I finally hit a snag here when one of the pegs came out the side of the gunwale. It broke the stem plate and a piece out of the gunwale. At first I was really upset, as I was running out of scraps of cedar that were deep enough to fill the area that I had cut out for the stem plates. But then I remembered how well I had done at pegging the deck beams into place. Many people had problems with that step when I didn't.

Here is a side view of the stern with everything in place. Next is to shape the plate to create a nice continuous line between all three pieces.

This is a view of the bow stem plate pegged into place.


Here is Danielle sewing a rim or flange onto her cockpit coaming. This will create a ledge for the sprayskirt to grab onto. The coamings have to be steamed and bent around a frame. Chuck is going to do this for all of us as we don't have a lot of coaming stock. Fine with me, since we only have one more day to work in the shop. I've been working on shaping my masik at home so I can peg it into place next weekend. I also shaped the chines, which run the length of the kayak between the keelson and the gunwales.

So what I have left to do is:

  • Place and lash the chines
  • Fit & peg the Masik
  • Need one more curved deck beam between masik and footrest
  • Deck stringers cut, pegged and shaped forward and aft of the cockpit
  • Seal the wood frame
  • Stretch the nylon
  • Sew it onto the kayak
  • Add cockpit coaming
  • Stain the skin
  • Seal the skin

Wow! That's alot to do yet. Wish me luck.


2.22.2009

Maiden Voyage


Chuck, our fearless leader has his qajaq finished enough to give it a test run. So he shrink wrapped it and I met him at a boat launch on the Clinton River just outside of Mt. Clemens.


After we shooed away the geese looking for handouts I helped him into his boat. We both had drysuits on with too many layers on underneath. It was cold and starting to snow.


Chuck seemed to like his qajaq and it looked really nice. So he took a little spin in it and declared no changes needed to be made. How exciting for him.


So he'll take it back to the shop and skin it with nylon this week. We will all have to pay close attention as no one else's qajaq's will leave the shop with skin on.

Seems to take forever


So it took me a while to figure out the shape for the stem pieces. I finally decided and transferred the outline to a cedar plank and cut it out using a jigsaw. I have learned to use so many new tools and each one has a learning curve. This will be so much easier next time. Ha!


Next I attatched the stem pieces by lashing them to the gunwales.

I attatched the keelson to the stem pieces by pegging it into place. First I added a strip to build up the stern area, it needed a little more depth.


In this picture you can see the added piece and the lashing on the first rib in the right corner.


A different view, you can see the pegs that I sawed off flush with the gunwales.


Some of the ribs had to be blocked up to meet the keelson. Then I lashed the keelson to the ribs.


These steps seem so simple writing them down, but they took hours for me to do. I have really been starting to freak out that I wouldn't have the qajaq finished in time. We have to be out of the shop on Saturday, Feb. 28th. But I've talked Chuck into allowing us to work on Saturday and clean on Sunday.

I put the qajaq on the floor to test fit it. It fits!! Now I'm working on fitting the masik, the large piece of wood you see here.


The masik holds you in place and gives you a lot of support. It is placed just behind your knees and as low as you can make it and still get into the qajaq. The masik is curved so it can be a little tricky. I have Pete to thank for finding enough curved branches for the whole class!


Ken's qajaq is on the left & you can see he has his chines in place on either side of the keelson. This is my next step. Then the masik, another piece to go over each stem, 2 more curved deck beam still needed...see why I'm worried?

Here is an oak log that was used to cut ribs from. You can see some of them on the right, we keep them covered and damp so they stay pliable.

2.10.2009

I have ribs


Rib stock is special as it needs to be air dried, not kiln dried like most wood. The grain also needs to be clear and going a particular way to help the bending process. So we decided to cheat and order rib stock from a guy who runs a qajaq building school out west. Unfortunately the shipment got lost in space. So we have been doing a mad scramble to come up with decent wood for our ribs. Someone finally found someone else who went out and cut down an oak tree for us.


So into the shop came logs that had to be processed by us, or I should say Chuck. I had started bending ribs with some of the stock we had left over and was having a rough time of it and feeling really bad about breaking pieces. Then I got my hands on the green ribs and everything fell into place, it was like night and day. And then it was late at night and time to go home.


I got back to the shop on Saturday to find my qajaq frame had been moved and my rib stick had disappeared. Yes, I had a minor melt down as it had taken me days to figure out how to make that darn thing. So an hour later I had another one made and started bending ribs again.


After getting all the ribs bent, I placed the keel strip on top of them to check them. A few will have to be blocked to meet the strip and a few I took down a little. Next I pegged the ribs into place and planed down the ends of the gunwales for the stem plates.


I taped cardboard to the ends of the gunwales to work up a pattern for the stem plates. I am so excited at my progress, I think this project might actually get finished.


Here is Ken lashing his stem plate to the end of his qajaq.


2.03.2009

Back to work


I managed to make it back into town so I could get to the work shop Monday night. I had the fun task of lashing all the deck beams into place. We used a flat, waxed, artificial sinew for the job. I chiseled a trough on the outside of the gunwales for the sinew. This way the lashings will be recessed and shouldn't rub or be visible under the skin.


Meanwhile Danielle was back and working on steam bending her ribs. Here she is sighting down her qajaq to see if they line up nicely. You can see the ones she has laid out to go next into the steamer.


Here is the steam box we have set up and the high tech device we use to bend the ribs.


Ken was next and managed to get all his ribs on too. Next weekend will be my turn, so I kept an eye on these two.